Here is a list of the main Identity Provider available with a link to a guide to configure them, some of them mention how to integrate with an specific Service Provider that you can follow as a guide adapting to to your custom Service Provider.
OKTA Instructions
How to Configure SAML 2.0 for Ekarda
In SAML terminology, what you will be doing here is configuring Okta (your SAML Identity Provider or "SAML IdP"), with the details of Ekarda (the new SAML Service Provider or "SAML SP").
Sign in to your Ekarda account with administrator access.
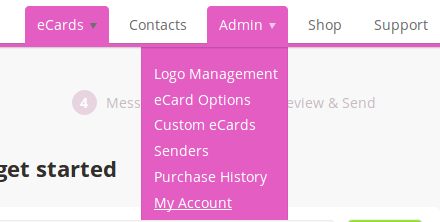
Access to the Account section.

At the bottom of the page you will find the SAML SETTINGS section where you will configure that SAML integration.
First of all notice that there is a link "Service Provider metadata" that will open a new browser view where the Service Provider data appear, click on it, you will need that data for the next steps.
Now open a new tab on your browser and access your Okta account. You may have administrator privileges in order to add a new SAML app.
Click on the blue "Admin" button

Click on the "Add Applications" shortcut

Click on the green “Create New App” button

In the dialog that opens, select the “SAML 2.0” option, then click the green “Create” button
In Step 1 “General Settings”, enter “Ekarda” in the “App name” field, then click the green “Next” button.

-
In Step 2 “Configure SAML,” section A “SAML Settings”, is where you may register the SP data.
As “Single sign on URL” set the value of the Location attribute of the AssertionConsumerService element of the Service Provider metadata.
Mark the “Use this for Recipient URL and Destination URL” checkbox
As “Audience URI (SP Entity ID)” set the EntityID value of the Service Provider metadata.
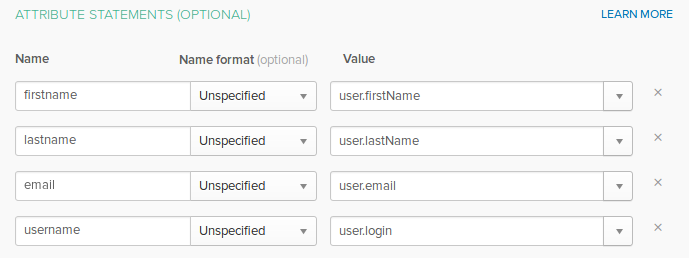
At the “Attribute Statements” section, set the following:

And click on Next, then select “I'm an Okta customer adding an internal app” and click on Finish.
-
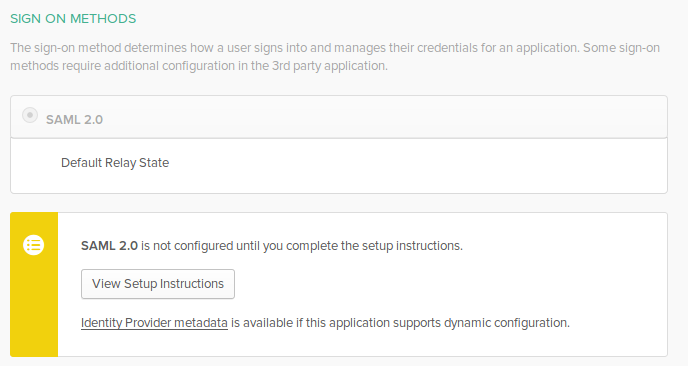
Now access at Okta to the “Sign On” tab, you will be able to find an “Identity Provider metadata” link, that will give you access to the IdP data, that we will register at Ekarda’s SAML settings section.

-
Go back to Ekarda and let’s configure first the IdP section. As “IDP Entity ID” set the EntityID value of the IdP metadata.
As “IDP Login URL” set the Location value of the SingleSignOnService with Redirect Binding.
As “IDP x509 Certificate” set the “ds:X509Certificate” value.
-
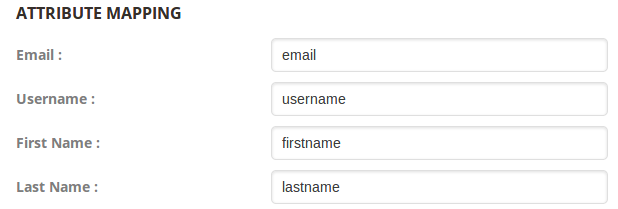
Now let’s configure the “ATTRIBUTE MAPPING” section as follow:

-
Now click on “Update”, the SAML integration is done.
You may enable the “Enable SAML” flag in order to enable the SAML functionalities, use that flag also to temporarily disable it.
Once enabled you will be able to execute:
- IdP initiaited SSO, by accessing Okta dashboard and click on Ekarda app.
- SP initiaited SSO, by accessing to https://ekarda.com/users/login/<company_id> where a SAML link will appear.
Just-in-time provisioning
By default Ekarda identify users by email so if Okta provides an email of an user that exists in Ekarda, it will SSO. If that account does not exists, it will be automatically created. If you want to only provision new accounts for a subset of your employees, you can configure Okta to provide a “CompanyId” value for those employees and at Ekarda, at the “Options” section of the SAML settings, enable the “CompanyId for JIT” flag.
How enable Single Logout
At Ekarda you can enable the Single Logout functionality in the Options section, after doing that and saving the settings if you access the SP metadata, you will see a SingleLogoutService element, copy the Location value, then go to the SAML settings at Okta, click on the Advanced Settings and “Enable the Single Logout”, set as Single Logout URL and paste the previous value you copy.
As SP Issuer set the SP Entity Id.
Let’s provide now the Signature Certificate, copy the “ds:X509Certificate” value of the SP metadata, use that tool to format the value and save the “ X.509 cert with header” version in a file as “sp.crt”, then upload it to Okta.
Then access to the IdP metadata, and search the Single Logout Service element with Redirect binding, copy its Location value. Go to the Ekarda SAML settings and paste it at “ IDP Logout URL” field.
ADFS Instructions
How to Configure SAML 2.0 for Ekarda
This topic provides instructions for setting up SAML authentication on Ekarda with Active Directory Federation Services (ADFS) as the Identity Provider (IdP). Your Blackboard Learn environment acts as the Service Provider (SP). While these steps use ADFS version 3.0 with Windows Server 2012 R2, the steps can also be applied to ADFS 2.0.
In SAML terminology, what you will be doing here is configuring ADFS (your SAML Identity Provider or “SAML IdP”), with Ekarda (the new SAML Service Provider or “SAML SP”).
-
Sign in to your Ekarda account with administrator access.
-
Access to the Account section.

At the bottom of the page you will find the SAML SETTINGS section where you will configure that SAML integration.
First of all notice that there is a link “Service Provider metadata” that will open a new browser view where the Service Provider data appears, click on it, you will need to import that data on ADFS so save it as a file.
-
On the ADFS Server, access the ADFS Management Console.
-
Navigate to Trust Relationships > Relying Party Trusts > Add Relying Party Trust.

-
Select Start on the Add Relying Party Trust Wizard page (with Claims aware).
-
Select Import Data about the relying party from a file, and use the SP metadata XML that you previously saved and click on Next.
-
Enter a Display name such as “Ekarda” and select Next.
-
Select I do not want to configure multi-factor authentication settings... and select Next.
-
Skip the step of adding an optional token encryption certificate.
-
Enable the SAML 2.0 WebSSO protocol support.
-
On the Configure Identifiers page, specify your ADFS Identity Provider.
-
On the Choose Access Control Policy select, Select “Permit Everyone” to Access this Relying Party and select Next.
-
Select Next on the “Ready to Add Trust” step and then select Close on the Finish step.
-
After the Relying Party Trust has been created, it should open the Edit Claims Rules if the last checkbox was left checked. Otherwise right-click the Relying Party Trust and select Edit Claims. On the Welcome page, click Start
-
On the Select Data Source page, click Enter claims provider trust data manually, and then click Next.
Ekarda requires username, email and firstname and lastname so we will need to create claims for all of them.
Read on those documentation how to do that:
https://docs.microsoft.com/en-us/windows-server/identity/ad-fs/deployment/configuring-claim-rules
https://docs.databricks.com/administration-guide/admin-settings/single-sign-on/adfs.html
https://docs.servicenow.com/bundle/helsinki-servicenow-platform/page/integrate/saml/task/t_ConfigureADFSClaimRules.html -
Now that ADFS is configured, we need to go back to Ekarda and configure it, but first download ADFS metadata by accessing
https://<ADFS_HOSTNAME>/FederationMetadata/2007-06/FederationMetadata.xml -
At Ekarda go to the IdP section.
As “IDP Entity ID” set the EntityID value of the IdP metadata.
Now search inside the IdP metadata XML the IDPSSODescriptor element, the following required fields need to be filled with data of this element.
As “IDP Login URL” set the Location value of the SingleSignOnService with Redirect Binding.
As “IDP Logout URL” set the value of the Location attribute of the SingleLogoutService with Redirect Binding (if any).
As “IDP x509 Certificate” set the “ds:X509Certificate” value.
-
Now let’s configure the “ATTRIBUTE MAPPING” section, we need to verify that ADFS gonna provide the desired attributes, for that check inside the IDPSSODescriptor element the list of Attribute provided. We expect that exists Attributes with the following names:
http://schemas.xmlsoap.org/ws/2005/05/identity/claims/emailaddress or
http://schemas.xmlsoap.org/claims/EmailAddress or
http://schemas.xmlsoap.org/ws/2005/05/identity/claims/nameidentifier (Email)http://schemas.microsoft.com/ws/2008/06/identity/claims/windowsaccountname
http://schemas.xmlsoap.org/claims/UPN (Username)http://schemas.xmlsoap.org/claims/CommonName or
http://schemas.xmlsoap.org/ws/2005/05/identity/claims/name
http://schemas.xmlsoap.org/ws/2005/05/identity/claims/givenname (FirstName)http://schemas.xmlsoap.org/ws/2005/05/identity/claims/surname (LastName)
Then fill the names of the Attribute elements available inside the related map field.
-
If you want to require Signature at ADFS on LogoutRequest and LogoutResponse sent by Ekarda be sure to configure it properly on ADFS and also on the Ekarda advanced settings section enable the sign flags and set the right algorithm. Also provide a private key and public cert. You will need to re-upload the Service Provider metadata on ADFS in order to register the new public cert of the Service Provider as well.
Other Identity Providers
Here is a list of the main Identity Provider available with a link to a guide to configure them, some of them mention how to integrate with an specific Service Provider that you can follow as a guide adapting to to your custom Service Provider.
